My photo
Hello! Welcome to my simple food blog. As the name implies, this blog is solely served as my repository on food. Desserts, home-made cooking, reviews both raves and rants, recipes, or whatever that I encounter :). Hope you enjoy your stay :) and if you feel like it or tried the recipe, do comment on it. Comments are loved ;).
Showing posts with label Japanese. Show all posts

Sunday, August 19, 2012

My First Kurokke

It's been a long while since the last time I do deep fry and true enough my deep frying skill shrinks so much compare to before (lack of practice off course)... So, this time I made kurokke/クロッケ (Japanese Croquette). Made the basic one because I have no confident to pull those fancy creamy kurokke LOL. So, I pulled up the recipe from the net (here). Yes, as the recipe suggests, it's easy, true, it's just my deep frying skill now sucks that my kurokke look like... below, not as shinny as I want them to be.


So, what's kurokke? For Indonesian, it's basically Japanese perkedel LOL... that's the basic one. The difference Indonesian use egg for coating, Japanese use pankon (bread crumbs). I didn't really follow 100% of the recipe because I don't follow recipe, that's all LOL...

What you need:
750gr potatoes - peeled, cut, steam for 20min and mash them
100gr minced beef
1/2 leek - julienned
30 gr grated cheese
Salt & pepper - as needed
Cake flour - as needed
1 no egg - for breading
Pankon - as needed

How to:
1. Cook beef and leek until soft and cooked, seasoned it with salt & pepper, set aside.
2. Add #1 and cheese into mashed potato, mix them until well mixed
3. Mould the mixture into patties. 70gr each will make about 9-10 kurokke.
4. Coat them with cake flour then do the breading station --> egg --> pankon
5. Deep fry them until golden brwon

Point from the website:
1. Coating them with cake flour supposed to prevent the kurokke from exploding when deep fried
Point from me:
1. Don't be stingy with oil. Pankon fried faster than the softer bread crumbs so deep frying has to be fast. If your oil is not deep enough and only cover half of your kurokke, the side will get burnt fast and you'll have kurokke with black sides.
2. Don't add butter into your mashed potato, it'll become too soft and not easy to be fried. It makes the kurokke tastes nicer though. Decision, decision haha...
3. If you don't have tonkatsu at home, you can mix tomato sauce, mirin and Worcestershire sauce. It should do the job. Or try it with mayo and lemon for different flavor.

Enjoy!

Sunday, July 22, 2012

Sweet Pea and Pork Stir Fry

Sounds normal? Hehehe, yeah it's one of those super simple and clean taste dish. I made this because I want to clear the sweet peas from my fridge. And I have a bottle of yuzu ponzu to try! Yuzu ponzu is soy sauce with yuzu flavor. It's refreshing and you can just use it directly as salad dressing. I got 1 small bottle of the Mizkan brand as a free gift few weeks ago.

How to:
150 gr shabu shabu pork
1 pack sweet peas (about 150gr, I think) - slit the sides
30 gr bonito stock (liquid)
2 clove garlic - smash it but don't chop
sake, dried chili, yuzu ponzu


How to:
1. On a wok, heat up oil and add in the garlic. When the garlic browns, add on sweet pea and stir fry for a bit then add on the stock and sake and close the lid for about 3-4 minutes or until the liquid is dried up. Throw away the garlic.
2. Then add on the pork and dried chili. Stir fry until the pork half-cooked and add on ponzu to your liking. I didn't add too much (maybe about 3 tbsp), but you can taste the hint of yuzu and slight saltiness. Don't add too much because you'll loose the sweet peas' sweetness.

Enjoy!

Thursday, July 5, 2012

Pork Chop Marmalade

Accidentally deleted the post, so this is just a repost. I did this recipe twice already and it keeps give me the satisfaction of cooking it. Simple dish with simple and clean taste. Let the dish speaks by itself. :)


What you need for 2 portion:
3 small potatoes - cut half
6 no snap peas - slide the sides
1 big clove garlic, smashed (I use 2 because the garlic that I have in the pantry are not big ones)
4 pc spare ribs
Sauce:
100 cc Sake
100 cc Soy sauce
50 cc water
150 gr marmalade
Seasoning: salt, pepper

How to:
1. On the wok, add oil and fry the garlic until slightly brown pan fry the potatoes until the flat side turn slightly brown. Using paper towel, absorb the oil, add water and close the wok with a lid.
2. While waiting for the water to be fully dried up, prepare the snap peas.
3. Once the water dries up, add on snap peas and add water again, close the lid.
4. Prepare the spare ribs, sprinkle salt and pepper both sides.
5. Once the water for the snap peas dries up, set aside the potatoes and snap peas. Using the same wok, grill the spare rib. Ensure both sides are slightly browning. Add on sake, soy sauce and water. Place the marmalade on top of the spare ribs. Close the lid for 15 minutes.
6. For presentation, the show adds some greenies.

Enjoy!

Saturday, June 30, 2012

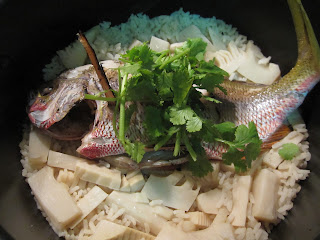
Takenoko Tai Gohan ~ Bamboo Shoot Fish Rice

This is the first recipe of 'One Dish,' and what makes me like the show. It's simple, not difficult to make but it's flavorful. On the side note, I really need to search for this show's files for my collection... so difficult to find...


What you need:
Bamboo shoots
1 Sea bream fish, inner parts taken out and dried
3 cup white rice
540 cc dashi
2 tbsp sake
1 tbsp soy sauce
1 tbsp mirin
1 tsp salt
Some greens (I use corriander leaves)

How to:
1. Cut the bamboo shoots to bite size, set aside.
2. Slash the fish body and damp salt on the fins and tail. Poke the fish with 3 iron sticks and sprinkle salt on both side. Place the fish on direct fire (using your stove) and grill it until half-cooked.
3. On a big nabe bowl, place the rice and all the liquids, stir until liquid well mixed. Then place the bamboo shoots and lastly on top, place the fish. Close the lid. Roll a small piece of aluminum foil and use that roll to cover the lid's hole. Cook for about 20-30 minutes on small fire until you see the rice is cooked. After you off the fire, let it be for another 15 minutes.
4. Place the greens on top as garnish.

In the show they also have sakura salt. It's very pretty if you have that. How to? Place pickled sakura and some salt and bake it in the oven until crispy and dry. Then crush it and you have a pink color sprinkle.

Points:
1. I don't have that huge nabe bowl, so I just use regular pot with a lid. Presentation-wise may be questionable but it works fine.
2. I used yellow tail fish, red snapper is too luxurious for this, I guess. But if you have Tai around, you should try use that.
3. I used the packed ones, not the fresh one like they have in the show


Enjoy!

Sunday, May 6, 2012

My First Mochi

When you want to do an experiment, Daisho is the good place to go, they have the packs of mochi mix, dango mix and other Japanese sweets ingredients and they're all at 2SGD. So, it won't really hurt if you fail LOL...


So, how does it fare? For first try, I think it's not bad, it's not as elastic as the usual mochi (because I didn't put lots of oil) but it's quite soft which is quite important because I won't eat them if they're hard to eat. It'll be more delicious if I use the home made red bean paste (made that before, it's a labor of love, sob)

What you need:
230 gr non glutenous rice flour
200 ml warm water
100 ml oil - set aside
100 gr red bean paste
100 gr soya powder

How to:
1. In a bowl, combine flour and water, mic with hand until well combined and you can tear the dough
2. Tear the dough to big balls and place them on damp cloth, cover them and steam for 20-25 minutes
3. Take out the dough along with the cloth and start knead them and tap some oil to make it easier to handle.  If you happen to have the big pounding stone bowl (along with the pounder), then you can use that, but I find that kneading do the job faster for making small batch. Keep kneading until dough become smooth and quite shiny.
4. Tear small piece of the dough, with small roller (if you have, if not big one also can do) roll it flat. Take 1 tsp of red been paste, place it on center then seal the dough and make it into a ball. Roll the ball into the soya powder until throughly cover. Repeat the process

It's not difficult to make, but you have to deal with hot water, and hot dough :)

What I want to try now is eat this with ice cream hehehe...

Saturday, April 21, 2012

Just Another Curry Rice

I guess there will be a never ending quest in adding extra stuffs into your curry concoction. This time it's what I saw in the drama that I'm currently watching. On the last scene of the first episode, the main character is serving curry rice to his siblings and they're raving about the curry rice, and he told them, 'it's miso and honey'. Me: OOOOHHHH, I never thought of that, sasuga, curry block endorser!

So, here we go and I gobbled this baby while watching the drama's 2nd episode haha... and it's the best curry rice that I've made so far...


Ingredients:

Curry Sauce:
2 big carrots - sliced
2 Russet potatoes - cut chunks
1 medium sized onion - cut chunks
150 ml chicken stock
200 ml water
1 apple - peeled and mashed
2 tbsp honey
1 tbsp miso paste
1/2 curry block (from the block packet for 4 people)  - thinly chopped
2 tbsp vegetable oil
1 red chilli - seeded and thinly sliced

Topping:
100 gr pork lean meat - cut strips
1 red bell pepper - charred, filmed and sliced
1 yellow bell pepper - charred, filmed and sliced
2 tbsp corn starch
seasoning: salt, pepper, dash of dried basil

How to:
1. On the soup pan, heat up the oil and stir fry onion and red chili until soft, and add on carrot and potatoes.
2. Pour in water and chicken stock and bring to boil.
3. In a bowl, mix in apple, honey, miso and curry block until well mixed and add them into the pan and stir in until it's dissolved
4. Change to small fire, simmer it until potatoes and carrots are soft.
5. On a bowl, mix in the pork with the corn starch until the meat all coated
6. On a wok, heat up the oil and dried chili until fragrant.
7. Add in meat and stir fry until well cooked
8. Add in bell peppers and seasoning, stir fry a bit and done.

Enjoy!

Sunday, March 11, 2012

Miso Soup

'ミソスープ作る手は 優しさに溢れてた
大きくない僕だから
寒くしないように 温めてくれた
そんな優しさ 会いたくなるね'

Well, that's Miso Soup song from Tegomasu, basically the song is about how miso soup reminds the person of his mom's TLC. Well, I'd think there'd be a pack of miso paste in most Japanese household, so miso soup is kinda basic home cooking for them. But, what about us? We've seen the 1001 varieties of miso soup served in restaurants. Is it difficult to make, though? NOPE, but you do need to have a good miso paste and good tofu, else, it's not satisfying at all. My favorite miso soup will be those with mushrooms, especially nameko. Nameko is slimy and in miso soup, it's soften up the flavor and it doesn't have that mushroomy smell.


Yield: 2 person
What you need:
1/2 pack of nameko
1/2 carrot, thin quarter slices
1/4 leek, julienned
1/2 pack tofu, cut 1cm cubes
500ml water
2 tbsp miso paste or about 1/2 soup laddle
1 tbsp soyu (optional)

How to:
1. Boil water and carrots
2. Add on miso paste. Using laddle, place miso paste on the boiling water and using chopstick, break the paste bit by bit. If you want to break it faster, use the small strainer.
3. Add on nameko and leek, these cook very fast so you don't need to wait very long before you off the fire.
4. On a bowl, place the tofu and pour in the soup, and you're done.

Tips:
1. Miso soup is the base for other soups. Add on pork belly and konyaku, and you have a tonjiru.
2. If you want to have a fancy version, change water to chicken stock or bonito stock.
3. You can play with other ingredients eg. bamboo shoots, wakame seaweeds, and other type of mushrooms eg. enoki, bunashimeji, etc.


This is what I call a good lunch *hohoho*

Enjoy!

Sunday, March 4, 2012

My First Gyoza

I've been making wontons... for years, but never ever try to make gyoza despite numerous times of salivating in front of TV on Gyoza shows (Japanese love their gyoza so they have gazillion ways of making it, and the idea seems to never end). I've learned from those show that making gyoza can be cheap or expensive depends on how much you'd like to splurge. The basic is the same as wonton, well, it's Japanese wonton duh :p. I still don't know how to make the skin, but so long as the supermarket sells ready-use wonton skin, I won't try to make one either :p... This time I just make the traditional gyoza filling (those that any ramen stalls have, no fancy stuff added) because I don't like to splurge so much for my first gyoza. And the result? Well they already goes smoothly inside my tummy and I'm quite satisfied with it. And the best part? They're not oily!


What you need:
1 pack Wonton/Gyoza skin (usually have about 40 slices)
350 gr minced pork
1 no small cabbage, chopped to small bites
1/2 bunch chives, sliced to very small bites. Chives' after cut edges are sharp so you may want to slice it very thinly, else it'll tear your gyoza skin (lessons from years of making wontons)
5 cloves garlic and 1 medium size ginger, peeled and chopped fine (use food processor to get very fine texture, you don't want to accidentally bite a huge piece of ginger inside your gyoza)
1 egg
1 tbsp mirin
Seasoning: salt and pepper
about 70ml chicken stock -- for cooking
Sauce:
Ginger, julienned
Soy sauce, mirin, vinegar


How to:
1. In a big bowl add in all ingredients except the skin and chicken stock. Using hand, mix them up until it's well mixed and you don't see lots of liquid on the bottom of the bowl (best if your bottom of the bowl is dry).
2. Place 1 tablespoon of the filling and seal it with water as glue. Some recipe will tell you to use egg but I find it too sticky and wet.
3. Repeat the same step, you should get about 30-40 gyozas depending on how you scoop out the filling with the spoon.
4. On a skillet (I use small one,and must have a lid), add on 2 tbsp oil, when it's hot, place about 7 (small skillet only fits about this much) gyozas and wait until the bottom slightly crispy then pour in the chicken stock and close the lid until all liquid gone and your gyoza is done!
5. Sauce is done by mixing all those ingredients together in small bowl.

Tips:
1. You can change chicken stock with just water, but it'll boring. In those shows, I've seen chicken stock, pork bone soup, milk, soya milk... basically any type of liquid exist in the cooking world used to cook the gyoza. All these will make a difference in terms of your gyoza's finishing look like. Some restaurants will have 'ears', they're usually the crispy part caused from the stock (this, I have no idea how they do it).
2. DO NOT open the lid when you cook it. The lid serve as a steamer to cook the wonton so they'll be just nice once the stock is totally vaporated, and at the same time, your gyoza butts will be crispy and slightly burned, perfection!
3. If you want to experiment with the fillings, make sure those like water chestnuts are chopped finely because hard fillings will easily tear the skin.
4. Best eat with? Beer! Sake! Ramen! That's why gyoza is a staple in any Ramen stalls around.
5. Alternative sauce, you can use Worcestershire sauce, surprisingly they go well together :)

Enjoy!

Sunday, February 26, 2012

The Curry Rice Got an Upgrade

I'm experimenting with a different type of curry rice, you know, those that you usually seen in the restaurant. Is it difficult to make? Nope, and it's healthier than the usual curry rice because now we have some colorful veggies :).

Yield: 2 person

What you need:
Curry Sauce:
1/2 pack Curry block. This time I use Glico brand 'LEE'. It's supposedly 10 times spicier, yeah right, still OK, not spicy at all, but definitely taste stronger than House's Vermont Curry
450 ml chicken stock (the recipe on the packet will ask you to add in 350 ml water but I find that it's too thick)
1 onion, sliced big
2 carrots, cut big
2 potatoes, cut big
1 apple, puree
Stir fry:
1 tbsp dried chili (yeah, I like this stuff)
1 orange pepper, charred and filmed, sliced big
2-3 Japanese eggplants, sliced by length
1/2 pack nameko mushroom
50 gr brussel sprouts, halved
150 gr shabu shabu meat
Seasoning: mirin, salt, pepper

How to:
Sauce:
1. On a sauce pan, saute onion until soft, then add on carrots and potatoes.
2. Add on chicken stock and bring to boil. Once boil, add on apple puree and curry block.
3. Boil until carrots and potatoes are soft.
Stir fry:
1. On a wok, saute dried chili until fragrant then add all veggies except orange pepper. Add on mirin accordingly as eggplants require lots of liquid to get soft. Close the wok with a lid for 5 minutes.
2. Once Eggplants are soft, add on orange pepper, keep on stir frying.
3. Add on shabu shabu meat, and cook until it's done.
Assemble:
1. On a plate, add rice on the half of the plate, and curry sauce on the other half. Then add the stir fried veggie and meat in the middle.

Enjoy! 


Saturday, February 11, 2012

Kakiage Donburi ... My Version


It's been a very long time since I did deep fry dish in my kitchen. So, I forgot a lesson or two on the art of deep-frying while making this kakiage donburi and ended up with quite a hefty casualty. Normally Kakiage is done with shrimps/prawns,squids and scallops (at least that's what MOS burger version has). Some restaurants will also use perilla leaves (I love those leaves but damn they're expensive). To me, I conclude that Kakiage is Japanese version of bala bala, OK slightly different, but the idea is the same. Basically you put together a of sliced veggies plus some seafood of your liking, mix it into a batter and deep fry it. That's why initially I'm thinking of making bala bala instead of kakiage. But there's a catch. In bala bala, the art is to make the batter not too watery and to stay fluffy after hours. We don't have to do that for Kakiage because guess what, you just need to follow tempura mix recipe on the back of the package, which is exactly what I did.

yield: 1-2 person (depends how big you want to make your kakiage)

What you need:
100 gr silver fish
50 gr carrot, julienned
1/2 no onion, thinly sliced
1 pack enoki
100 gr tempura flour
160 gr water

Sauce:
7 tbsp soy sauce
4 tbsp mirin
1 tbsp Worchestire sauce
1 tbsp honey
5 tbsp water

How to:
1. On a bowl, make the tempura batter, and add on the rest of ingredients, mix well
2. On a wok, heat up oil to 170-180C (How do you know? Just do a random test, splash bits of tempura batter, if it come up fast, then it's ready for frying)
3. Deep fry the portion
4. Sauce: on sauce pan, mix all the ingredients and heat them up.
5. Assemble: On your bowl, place rice, pour in bit of sauce (not too much, but to your liking). Place the kakiage on the top, and drizzle it with the sauce again.


Tips:
1. If you're too lazy to heat up the sauce, don't add water to it. Just mix the rest of ingredients on a bowl and use it.
2. My crash course refreshment on the art of deep frying:
    - Don't be stingy with your oil and use a big wok because deep frying is not the same as pan frying, the oil will rise up when you put in the kakiage. If you use small pan, you'll have lots of oil to clean up afterwards
    - Keep your tempura batter cold. Cold batter will make your stuff crispier
    - Pay attention to the oil temperature. If the oil not hot enough, you'll end up with a soggy kakiage (which is my first batch). Bala bala still can take lower temperature because of the way its batter is made, but not kakiage.

Monday, February 6, 2012

Buta Miso ~ Pork Miso

Now I know why Japanese are very proud of their miso and why miso have different prices. You don't need any thing else if your miso is good enough and your dish will taste just nice. This dish is very easy to do and you can vary it with other stuff too.


What you need:
1/2 no onion, thinly sliced
30 gr chives, cut 4cm length
100 gr pork shabu shabu meat
1 tbsp miso
2 tbsp mirin

How to:
1. On the pan, saute onion until cooked and fragrant
2. Add in miso and mirin, mix until miso is well dispersed but still retain the color
3. Add in meat, if you feel that you need to add some water, do add on mirin instead
4. Once the meat is half cooked, add in chives, mix in until it's all cooked

Tips:
- If you feel that the miso taste is too strong for you, you can add some water, but the color will change to what you often see in miso soup, like below. For this version, I only use chives, pork, miso and mirin. I didn't even use oil. I like the top better than this one, but you can give it a try if you feel like having a milder version.


Enjoy!

Sunday, February 5, 2012

Yakisoba Made Easy


I absolutely love having frozen shabu shabu meat in my freezer and this is one of the reason why. It's so easy to make any dish, especially when you're in a rush or just plain hungry. I used fresh yakisoba noodles instead of the instant one because initially I bought this to cook ankake cripy noodles (it looks so good on the show that I watched) but alas, I cringe at how much it'll cost me to whip up one just for myself. So, that 1 packet of noodle has been sitting in my fridge for quite some time. Off course using the fresh noodles will make the dish taste better because fresh noodle is thicker and more chewy, but if you happen to have just the instant noodle, that will do as well.

yield: 1 person

So what you need:
1 pack of fresh yakisoba noodles (usually they already include the sauce seasoning inside, so it's easy)
1/2 no onion, thinly sliced
100 gr shabu shabu meat (usually it's about 6-7slices)
30 gr leek, thinly sliced (to make it look pretty)
Seasoning: mirin

How to:
1. On frying pan, saute onion until cooked and fragrant.
2. Add on shabu shabu meat (still frozen) and splash some mirin to melt and cook it.
3. When the meat is half cooked, add on leek and noodle, and yakisoba seasoning and you're done.
    * when you use fresh yakisoba noodles, as often the noodles stick together so you'd need to break them up by adding bit water and using chopstick wiggle them bit by bit until all noodles are loosed.

Saturday, February 4, 2012

Shirasu Pasta


Another result of watching too much variety shows, here is Shirasu pasta. This is a very simple pasta with simple taste, and a no brainer to do. I find it quite foolproof, so very small chances of screwing up this dish.

*for 1 person

Ingredients:
100 gr pasta - boiled until al dente - put in 2 pinch of salt in the water (the part that Aiba-chan forgot to do in his :p)
1/2 red chili - sliced thinly and seeds removed
3 cloves garlic - chopped coarsely
35 gr shirasu
2 tbsp olive oil for stir fry

How to:
1. in the frying pan, add in oil, garlic and chili and saute until fragrant (don't let the garlic burned)
2. add in Shirasu, stir fry for about 1 minute
3. add in pasta, stir the pasta until the shirasu is well mixed

Tips:
1. add sunny side up egg, it'll taste better (there's no egg in the pic because I had too much eggs lately :()
2. if your budget is accommodating, add more Shirasu, the the more the merrier
3. Shirasu by itself is already salty, so don't add too much salt when you cook the pasta. I roughly only add about 2 small pinch of salt and it tastes just nice, not overwhelmingly salty

Nabe ~ The Lazy Version ~


I watched too many variety shows that has nabe/shabu2 or basically anything with a pot, and tons of stuff inside that pot and it looks mouth watering. From one of the interviews that I watched (viva fansub), 1 person can have sooo many of types of nabe pots and he's a damn busy person, so it shouldn't be THAT hard to cook, right? And, yeah, it's not hard, and basically you just need to put in what you like there. And, NO, having chinese cabbage/sawi/white cabbage whatever is NOT my idea of shabu2/nabe because it's cheating and I hate restaurants who try to cheat you by having lots of cabbage and only tiny 5 slice of meat on the top. My version also have about 5 slice too but underneath those meat is definitely not the damn cabbage, and it still didn't cost me a bomb to make.

This recipe is just nice for a 1 person nabe pot like what I had in the pic.

Ingredients:
1/2 cup bonito stock -- this is the 1 time suffering but you'll enjoy many times of goodness
1/2 cup chicken stock -- I use organic chicken stock, no way I'm gonna boil the chicken bones to make my own stock
1/2 cup water -- no need to use all
1/4 part leek (the big one) -- julliened
1/2 part carrot (another big carrot) -- julliened
1/3 part of shabu2 meat packet -- usually 1 pack will have about 20 slices, so make your own ration, I conclude 1 packet = 3 times of goodness
1/2 pack tofu -- sliced
1 pack enoki mushroom -- cut the root

How to:
1. On the nabe pot, place leek, carrot, and enoki, then tofu and meat. If your stocks are in ice cube form aka frozen, place them on the bottom. Then pour in all the stock first then water until you can see the liquid in between the tofu.
2. Close the lid and bring to boil in very very small fire. It should be done w/in 10-15 min and the meat will be nicely cooked too.

The suffering part --> bonito stock
1 pack bonito --> follow the instruction on how to make bonito stock behind the packet. Usually 1 big pack of bonito can make 2L of very very nice stock and another 1L of a not so fragrant stock but stil can do. Use ice cube tray to freeze your stock for nice rationing (Daisho have tons of different sizes and I think they have pink ones too). You can add konbu too but I find that konbu is bloody expensive.

Tips:
1. Use chives if they're available instead of leek. Most of nabe that I saw (including the one that I had in Fukuoka) have chives. Leek is probably more for shabu2, but anything goes in my kitchen :p, whatever makes me happy.
2. Do add some red chillies (can be dry or fresh), it'll add a zesh and color on your nabe.
3. Don't use green onions because they're slimmy and you can't really julliene them
4. If you're too lazy to julliene, slice carrots very very thinly but it doesn't look so nice :p
5. Do add raw egg just after you open the lid, let the egg yolk raw. This way, you can have 2 flavor of your nabe in 1 bowl. The first one if your original flavor, then you poke the egg yolk and mix into the soup and you'll get another different flavor. Egg yolk makes your nabe creamy, which is yum...


Curry Rice ~ カレーライス


It's a yummy treat, worth to try and it's very easy to make, a no brainer. I make minced pork curry this time because I lazy to cut any meat, that's all.

Ingredients:
1 pack Japanese curry pack (i use Vermont honey apple curry - Hot
300 gr minced pork
300gr carrot - cut big
300gr potato - cut big
2 onions - sliced thick
2 banana
1 gala apple
1 big scoop of honey (I use dark honey)
500 ml chicken stock
350 ml water

How to:
1. Sautee onion until cooked, then add on minced meat and cook until meat is well done.
2. Add on carrot, potato, chicken stock and water, bring to boil.
3. Mesh apple and banana using blender, mix in honey and cut curry block. Add them in.
4. Cook until the carrot is soft.

Tips:
1. it's ok to use apple only, you can use more apple to substitute banana
2. you can substitute potato with apple (it'll more sweet and less starchy)
3. And always if you're eating the curry rice with egg, poke the yolk and mix it with the curry sauce, you'll get a totally different taste, and yummy level goes up 1 more notch

Challange: I saw on some show that they actually add chocolate or coffee. Never try this, guess, I'll leave this to the real restaurant to do LOL...


Salmon Miso Soup


Yeah, I ate the same thing at Sushi Tei with 1 bowl of soup cost you 8SGD++ (so total of 10SGD). It's a good comfort food, so why not do it at home? After all, almost everything in the bowl are available in the supermarket. Note that I didn't even need to go to the Japanese supermarket for ingredients, so this is good. The only thing that's lacking from my version is the green color, the leek. Though having leek in your miso soup is a very good thing since leek brings out lots of sweetness to your soup, but unfortunately it deteriorates your soup life by very wide margin, especially if you plan to freeze your soup, like what I'm doing now.

Ingredients:
150 gr salmon - cut pieces (best if you can get fatty salmon)
1 pack enoki mushroom
1 pack maitake mushroom
1 pack konyaku - cut small cubes
3 medium carrot - cut medium
1 pack tofu - I use firmed tofu
1 small onion - sliced thinly
10 small blocks bonito stock (home made)
Seasoning: miso paste and cooking wine (to your taste)

How to:
1. On soup pot, pour in about 600ml water and bonito stock (you can add on water to your liking), over small fire.
2. Add on carrots and onion, bring to boil, let it simmer until carrots are half-cooked
3. Add on miso paste and the cooking wine, adjust taste
4. Add mushrooms and konyaku, let it simmer for awhile
5. Add tofu and salmon the last. Once salmon is cooked, off the fire and serve.

Tips:
- For cheaper alternative, sub salmon with chicken or sliced pork (it'll become tonjiru)
- Good miso paste means better soup base. This time I just use whatever miso paste available in the supermarket, and not being picky.
- I use the plum wine instead of the usual cooking wine. It'll be much sweeter in term of taste but I'd preffer it that way to balance the miso. Sake is definitely welcomed too.